I'm sure most of the tech-savvy developers out there have already downloaded and tried to install Visual Studio 2010 Beta 1 and Visual Studio 2010 Beta 2. If you did, well there are some important things to note about the installation and removal of Beta products. Let's first start with Visual Studio 2010 Beta 1. When this first came out a few months ago, it was a huge milestone for the Visual Studio product team. However, as with all "Beta" products you need to follow the directions given by the product teams ver batum. If not, you will have issues that will cause you to pull your hair out of your head and drive you nuts. Also, you may have gotten errors when trying to uninstalling the "Microsoft Framework 4 Client Profile Beta 1" as well. Well, at least it did for me.
For the most part I followed the directions after downloading & installing the first beta release. However, when beta 2 came out 2 weeks ago, I was quick to just on the download and wanted to see all the new and updated features. So, just like any normal person I went and started unstalling my Beta 1 Visual Studio 2010. Well, first mistake I made was not to uninstall in the correct order. Check here for the correct order. http://www.hanselman.com/blog/VistaUsersUninstallVisualStudio2010Beta1BeforeUpgradingToWindows7.aspx.
So, if most of you uninstalled in the wrong order you may have some interesting side effects. One of the most painful side effects for me was trying to get rid of "Microsoft .NET Framework 4 Client Profile Beta 1". For the life of me, I could not get this to uninstall off my computer. I was searching for everything in the blogosphere to figure out what registry hack or trick I needed to get rid of it. Well after completely removing all of my .NET Frameworks and re-installing all of them, which may or may not have helped, I decided to hack the registry myself to figure out how to fix my computer.
First thing you need to is grab a free copy of a good registry tool. Check here > http://www.resplendence.com/ Once you have this tool, it makes it super easy to find things in your registry with simple searchs. Very helpful! Once you have the tool installed, do a simple text search for "NET Framework Client Profile" and you should get a decent amount of results. Most of them will be a registry location [HKEY_LOCAL_MACHINE/SOFTWARE/Classes/Installers~]. You need to find the one entry that lists the "Microsoft .NET Framework 4 Client Profile Beta 1" and delete it. I would recommend also making sure that in Control Panel > Add & Remove Programs that you have no programs associated with Visual Studio 2010 or .NET Framework 4.
So, once all this has been completed, you probably should do a re-boot just to be safe and then try to re-install Visual Studio 2010 Beta 2. If you still get errors, you might need to completely remove all traces of the dot NET framework and do a complete re-install. Here are some tools to help you do that. For dot NET detection tool which is pretty simple, check here > http://www.softrecipe.com/System-Utilities/Utilities/net_version_detector.html. This will tell very simply what versions of the NET Framework you have installed on your computer as well the version that are not. Now, you will probably need a tool to completely remove dot NET framework versions from your computer as well. Check here > http://blogs.msdn.com/astebner/archive/2006/05/30/611355.aspx This tool will completely remove all traces of the .NET framework from your machine. However, it only goes up to version 3.5 right now. Either way it is still a great tool to help easily remove dot NET versions from your machine.
Well I hope this helps all the tech-savvy developers out there! If you have any questions or comments, please post.
My new quote of the day - "Always remember, use a virtual machine"
Monday, November 2, 2009


Tuesday, October 13, 2009
Dynamically Changing Javascript Events
If you have ever had to work with client-side code and make your functions change dynamically this article is for you. Whenever you are working with client-side code you need to remember that you need to maintain the state your code because once the DOM(Document Object Model) has been created you can only modify it with JavaScript. This introduces another problem. If you want to see the raw output of a page after it has been created from the server you can right-click in most browsers and click "View Source" or something similiar. That will give you the raw text that was sent from the server. Also, depending on what browser and browser version you have installed you may get different outputs.
I am sure many of you reading this may have seen this kind of code before:
This code assigns a function that will execute when the page is finished loading. Pretty simple and straight-forward. However say we need something more complex, like take elements that already have onclick events and need to re-assign/change their onclick methods for any number of reasons on the client-side. For example:
Everything works as expected our radio button now has a new function whenever it is called. This is where it gets tricky. Say we have a function that needs to pass in arguments to our SayHi2 method. Like 'name'.
We cannot assign this new function to our existing code like this.
It will drive a person crazy to figure out that when this code gets executed that whatever the 'name' variable was that was passed in will change after you set this up. Very frustrating! Also, some blog posts I have read say that if you want to change the onclick event handler you must declare the function like so:
This just does not work at all. It looks like will work but because you are dynamically changing the onclick event handler there is a high-possibility of your variables getting changed when your function executes. I think the reason is that JavaScript by nature is dynamic and anytime you change something that is dynamic you will get unexpected results. I am not sure why my variables changed unexpectedly but there is another way to set the function on the fly correctly. So, in the event that you are changing event handler this way you should do it following way:
This will call the Function() constructor which will build and assign a newly creately function to the radio button. This will make sure that your variables are not changed when your function executes. If you have any thoughts or comments, please post!
Josh
I am sure many of you reading this may have seen this kind of code before:
window.onload = SayHi;

function SayHi(){
  alert('hi');
}
This code assigns a function that will execute when the page is finished loading. Pretty simple and straight-forward. However say we need something more complex, like take elements that already have onclick events and need to re-assign/change their onclick methods for any number of reasons on the client-side. For example:
//Assuming this already had an 'onclick' event like 'onclick=SayHi();'
var radioButton = document.getElementById('myRadioButton');

//Now lets say we wanted to change the onclick functionality or whatever...
radioButton.onclick = SayHi2;
Everything works as expected our radio button now has a new function whenever it is called. This is where it gets tricky. Say we have a function that needs to pass in arguments to our SayHi2 method. Like 'name'.
function SayHi2(name){
alert(name);
}
We cannot assign this new function to our existing code like this.
var radioButton = document.getElementById('myRadioButton');
radioButton.onclick = SayHi2(name);
It will drive a person crazy to figure out that when this code gets executed that whatever the 'name' variable was that was passed in will change after you set this up. Very frustrating! Also, some blog posts I have read say that if you want to change the onclick event handler you must declare the function like so:
var radioButton = document.getElementById('myRadioButton');
radioButton.onclick = function SayHi2(name);
This just does not work at all. It looks like will work but because you are dynamically changing the onclick event handler there is a high-possibility of your variables getting changed when your function executes. I think the reason is that JavaScript by nature is dynamic and anytime you change something that is dynamic you will get unexpected results. I am not sure why my variables changed unexpectedly but there is another way to set the function on the fly correctly. So, in the event that you are changing event handler this way you should do it following way:
var radioButton = document.getElementById('myRadioButton');
radioButton.onclick = new Function("SayHi2("'" + name + "'");");
This will call the Function() constructor which will build and assign a newly creately function to the radio button. This will make sure that your variables are not changed when your function executes. If you have any thoughts or comments, please post!
Josh
Thursday, October 1, 2009
Google Wave - Next Generation Web
Google's Wave product was just released to 100,000 test users yesterday. Google Wave is a
new product from Google that offers a complete real-time interaction with an endless number
of people simultaneously. You can check out the link here at wave.google.com . Here is a
screen shot of what it looks like. The first shot is main dashboard. The second shot is a detail
view of the concurrent real-time edit mode.


Google Wave currently is only available for limited preview. You have to register with Google to
be able to download and demo the product. From yesterday there were 100,000 users allowed
to download and use the product. Also, each test user was given 8 additional invites to allow
additional users to use the product. As this product is still very early in its life cycle, we should
see more features being put into this product with customer reviews early on. Hopefully, Google
will release more invites out to the community for others.
Tuesday, September 22, 2009
How to get started with programming - Microsoft Ramp Up Program
If you are new to programming or just getting back into the mix you have to check out Microsoft's Ramp Up program. This new offering from Microsoft offers an abundance of knowledge, training, and video tutorials for beginners, intermediates, and advanced users for free. I have personally signed up for the offering by creating a Windows Live ID logging into the website. In a short amount of time I have been able to get up-to-speed in several technology areas that I needed help with. The content is straight-forward and simple.
From the initial onset, Microsoft is really trying to help customers get a grasp of their products for free. I highly recommend this for all programmers whether you are a novice or easoned veteran this site offers a great wealth of knowledge. They offer many different types of learning paths and topics. Topics include: Silverlight Development, Share Point Development, Java Developers: Intro to Microsoft .NET, PHP Developers: Intro to ASP.NET.
Take a look at the site here - http://msdn.microsoft.com/en-us/rampup/default.aspx
If this program seems like something that may interest you and you would like to get a more official training approach I would check out http://learnvisualstudio.net . I have personally used them for my .NET training in the past and it has been the best I have ever found on the internet.
From the initial onset, Microsoft is really trying to help customers get a grasp of their products for free. I highly recommend this for all programmers whether you are a novice or easoned veteran this site offers a great wealth of knowledge. They offer many different types of learning paths and topics. Topics include: Silverlight Development, Share Point Development, Java Developers: Intro to Microsoft .NET, PHP Developers: Intro to ASP.NET.
Take a look at the site here - http://msdn.microsoft.com/en-us/rampup/default.aspx
If this program seems like something that may interest you and you would like to get a more official training approach I would check out http://learnvisualstudio.net . I have personally used them for my .NET training in the past and it has been the best I have ever found on the internet.
Friday, September 11, 2009
Dyanmic Controls in ASP.NET - From the field
[Intro]
In any enterprise application there is always the need for dynamic content based on some set of business rules and/or criteria. As an ASP.NET developer sometimes we have the opportunity to drop a control on web page and bind it some data list and call it a day. However, there are some times when we need the structure and layouts of our asp.net pages to dynamically change. For this reason, we need to dig deeper into the asp.net engine and understand the asp.net page life cycle. For brevity, I am not going to get into the complete life cycle but talk about the important gotchas for dynamic control rendering.
There are some "gotchas" when creating dynamic controls in ASP.NET.


It helps to understand what is happening when the page executes and why we need to code like this. This may sound incorrect but in order for our pages to work correctly, we need to create our controls twice , 1 time on the initial load and 1 time on the post back. The reason we need to do is this is because when the page posts back from the initial load the control hierarchy does not exist anymore, i.e it is not in memory for us to access. This is why we needed to add our controls and create our page hierarchy on every page load regardless if the page is posting back or not.
This is an initial post on dyanmic controls in ASP.NET. I will post more in-depth articles in later posts. I wanted to illustrate that creating dynamic controls is somewhat advanced skill to master in the ASP.NET stack. I also wanted to show an example of one way you create dynamic controls.
Our company is a technology consulting firm specializing in the Mircosoft toolset. We also offer SEO optimization and Microsoft .NET consulting. Please checkout our website http://voralityconsulting.com

In any enterprise application there is always the need for dynamic content based on some set of business rules and/or criteria. As an ASP.NET developer sometimes we have the opportunity to drop a control on web page and bind it some data list and call it a day. However, there are some times when we need the structure and layouts of our asp.net pages to dynamically change. For this reason, we need to dig deeper into the asp.net engine and understand the asp.net page life cycle. For brevity, I am not going to get into the complete life cycle but talk about the important gotchas for dynamic control rendering.
There are some "gotchas" when creating dynamic controls in ASP.NET.
- You need to know that if you need to access the values in the controls on the "post back" of the page you need to create the controls in the "OnInit" event.

- When adding dynamic controls to a page, it is usually helpful to know where these controls will be located at in the page hierarchy.
- If you add the controls in the "Page_Load" method , you will not be able to capture their values.
- It makes sense to put your controls in some type of container so when you collect the values from the controls you know where to look. This is important because when you capture the data from the controls you will only be able to find the control if it belongs in the container you specify.

It helps to understand what is happening when the page executes and why we need to code like this. This may sound incorrect but in order for our pages to work correctly, we need to create our controls twice , 1 time on the initial load and 1 time on the post back. The reason we need to do is this is because when the page posts back from the initial load the control hierarchy does not exist anymore, i.e it is not in memory for us to access. This is why we needed to add our controls and create our page hierarchy on every page load regardless if the page is posting back or not.
This is an initial post on dyanmic controls in ASP.NET. I will post more in-depth articles in later posts. I wanted to illustrate that creating dynamic controls is somewhat advanced skill to master in the ASP.NET stack. I also wanted to show an example of one way you create dynamic controls.
Our company is a technology consulting firm specializing in the Mircosoft toolset. We also offer SEO optimization and Microsoft .NET consulting. Please checkout our website http://voralityconsulting.com
Sunday, September 6, 2009
The power of becoming a member on LinkedIn
www.linkedin.com is one of the important networking sites you must belong to. The site has so many opportunities for business people in the world today. In the past, before the Internet and social networking people could only communicate through social interaction and the telephone.
In the world of today where social networking has completely taken over the web many people have succeeded in numerous ways that they could not have before, in terms of networking and social interaction. Today, when you use sites like www.linkedin.com you can not only know people who are your direct friends and colleagues but people who are indirect friends of your friends. This free availability of relationships is something that was never possible before in the previous world of social interaction and networking. Thus, my point being that being a member of a site like www.linkedin.com is a requirement in today's fast-paced business world.
The opportunities that have been presented to me are numerous and I can't think how such amazing opportunities would have been without www.linkedin.com before. All I can say is that you need to check out this site and get registered! It will definitely help your career and job outlook. It also has many other benefits that I won't list but you can see the potential once you get signed up on their site. Check it out!
Monday, August 31, 2009
How to setup your own mail server for free
[Some Intro]
Setting up your own mail server is something that most IT folks should know how to do. It can benefit you to host your own mail server so that you can have complete control over your email addresses and email accounts. There are several products that you can purchase to do this for you such as Microsoft Exchange Server, Sendmail, FastMail.FM, and many others.
Setting up your own mail server is something that most IT folks should know how to do. It can benefit you to host your own mail server so that you can have complete control over your email addresses and email accounts. There are several products that you can purchase to do this for you such as Microsoft Exchange Server, Sendmail, FastMail.FM, and many others.
The point of this article is to setup your own email server on Windows Server 2003 in a short amount of time and for free. I have been trying to setup my own mail server for the longest time and have always been able to receive mail but could never get it work from my home office. After about a year of trying and reading through endless blogs and newsites I have finally figured it out. There have been many articles out there claiming to show you how to setup a mail server but they all come up short. I will give you all the information you need to get started in about 15 minutes.
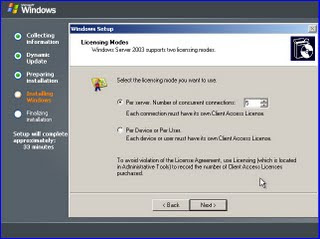


[Step 1: Install Windows Server 2003]
Setup the Windows Server with all the defaults and click the installation wizard until you are done. Once you are done installing the server, you need to add Email Services (POP, SMTP) to the server. This option is not installed by default when you first install Windows Server 2003.
[Step 2: Enable email services on the server]
To enable "Email Services" on the server you need to open up the Manage Your Server screen from the start menu. Click on the Mail Server option and click next.

Once you are here, you will be able to install SMTP service for sending and receiving mail and the POP3 service for allowing clients to connect and download their mail with an email client. Click through the next screen and accept the defaults. Once you receive the window that tells you the server is now a "Mail Server", click complete/finish and close the diaglog. The next part will talk about the configuration of the Mail Server. There are two parts to setting up the mail server, the first being the POP3 component, and the second being the SMTP component.
[Step 3: Setting Up/Configuring the POP3 component]
Now that you have the POP3 component installed, you need to setup a mail domain. The domain can be anything you want but must be a domain that must be configured in your MX record.

Once you get to this screen, go ahead and create a domain. (yourdomain.com, your domain.net, etc.) After you create the domain go ahead and create a test mailbox under that domain.

Create the email account and setup a password. This user will be added to the "Email User" group on the server and will only have permissions to access to the POP3 service and the SMTP service. For setting up the POP3 service that is all that is needed unless you need to change your InBound email port which is by default 110. If you need to change this for any reason, in the POP3 Managment window, click on properties of mail server and change the port number in the diaglog window. That is all that is needed for the POP3 service component.
[Step 4: Setting Up/Configuring the SMTP Component]
This part requires that majority of the time spent on setting up the mail server to work properly. First, we need to make sure that SMTP service is installed and is running. On the server , click Start > Adminstrative Tools > IIS Manager. Once you are here click on + on the server and make sure you can see the Default SMTP Virtual Server node.

Here is where the majority of the configurations go wrong. Make sure you follow the directions listed below. Right click on the properties of this and you will see a dialog that will have several tabs on it. I am going to explain each tab and the properties that need to be set in order to get your mail server working properly.
[Tab 1: General]
- The only setting you need to check is the port number that will be used for sending and receiving email. In the dialog, will be able to specify an IP address that will be used for the email or you can leave it as [All Unassigned]. Leave this as the default and click properties. In this dialog, you can change the port number for the SMTP server. I would recommend using 25 but if you want to use another common mail port you can change it here. In some cases, most ISPs block port 25, but check with your ISP and find out if they block port 25. If so, you may need to change this number here to 587 or another port number that they don't block.
[Tab 2: Access]
- Under access control, click details and make sure you have Anonymous Access and Windows Integrated Authentication checked.
- Under Relay Restrictions, click detail and make sure the "All Except the list below" is selected. You will still be secure by doing this in that only users who were authenticated can access and relay email through this mail server. You don't want your server being used for SPAM!
[Tab 3: Messages]
- Here you can specify the max mail message size and where bad mail will go.
[Tab 4: Delivery]
- Here you can specify the outbound message info. You want to make sure under "Outbound Security" that you have "Anonymous Access" selected only.
- Under outbound connections, you need to make sure the correct port is set based off the initial port we specified back on the properties of the SMTP server above.
- Click Advanced, then here you need to specify the fully-qualified-domain-name of your domain. (YourDomain.com). Whichever you used when you created the mail domain for the POP3 component.
- Still under Advanced , you will need to configure a smart host if your ISP blocks your IP address from sending mail over the internet. My ISP offers a free relay for SMTP/POP access , so I contacted my ISP's website and obtained the server names and placed the smtp ip/domain in the smart host field. If you forget this, the email will never be sent if you are using a Dyanmic IP address or are on a email blocklist/blacklist.
[Tab 5: LDAP]
- Skip this
[Tab 6: Security]
- This lists the user groups able to access/modify the SMTP server
Now that we have the SMTP component configured we can start testing our configurations and sending some emails. The first thing I start with to test is using the command line and telnet.
Click Start> Run> Enter "cmd.exe" and the command prompt opens. You will need to do this from the server computer and from another client computer that can access your mail server. Make sure if you mess up when typing , don't use backspaces because the mail server expects the exact amount of characters and will not work so be sure you enter the info correctly with no mistakes. If you mess up tho, no worry, just start the process over. Be careful when you type!
- Type cd\, then you should have C:\ prompt, then type - "telnet yourdomain.com [portNumberYouUsedInSMTPproperties]
- If you connected successfully, you should get a response back from the mail server that tells you the name, date, and other relevant info in the command prompt.
- Then type , "helo", this will make sure you can communicate with the mail server.
- Then type "mail from: yourMailBox@yourDomain.com" and click enter
- Then type "rcpt to:yourMailBox@yourDomain.com" and click enter
- Then type "data" and click enter
- Then type "A Test Message" then click enter
- Then type "subject: A test message" and click enter"
- Then type "body: This is test message" and click enter"
- Finally, click "." and click enter, if you did this correctly, you will see a response from mail server that says, "Email Queued for Delivery"
- Close the command window.
The first test is to check your POP3 service and see if the mail was successfully delivered to the email address you specified above. If you have a message count under that mailbox of 1 then you know it worked. The next test would be to do the same thing from another client computer that can connect to this mail server. Another test would be to send an email to an address outside of your domain. This problaly will not work because 99% of ISPs will have your dynamic IP address on a blocklist/blacklist. I will talk about this next on how to get around this.
[Step 5: Getting Around the BlockList/BlackList Issue]
[Only do this if you can't configure a smart host]
As mentioned before, all ISPs block dynamic ip addresses from sending mail because of the heavy use of spam on the internet. This is a good thing for all the users out there that actually are good internet citizens. What you will need to do is go to http://www.spamhaus.org/
Once you are here, enter your IP address into the IP address checker on the left side of the site. Once you run this , you will end up on one of the lists, click on the link provided, and follow the directions. Since your server is already setup and active, you can request to be removed from the blocklist\blacklist. Just follow the link that they provide after you input your IP address. It should take about 24-48 hours to process your request and after just check to make sure your IP is not on the blocklist\blacklist anymore and you start sending and receiving emails.
If all of the tests worked and you are not on a blocklist\blacklist anymore, all you need to do is configure your client mail programs, which should be pretty straighte forward.
[Step 6: Setting Up Client Email Program]
For this section, you have many options. You can use the default OutLook Express, Microsoft Office Outlook, Mozilla ThunderBird, and several other products that allow you to manage your email from a client computer. The simple and most easiest to use is Outlook Express.
Setting up an account is pretty simple. The first time you run Outlook Express, you will be prompted to setup and account. Follow these steps:
- Add new Email Account (POP3)
- In the wizard, enter your name for your account , this can be anything you want so you can reference later.
- Next enter your email address in the email address field.
- In the Incoming Mail Server: pop.YourDomain.com
- In the Outgoing Mail Server: smtp.YourDomain.com
- In the Account Name: YourMailBoxName@YourDomain.com
- In the password Field: password used to setup the mailbox from before
- [Optional] If you changed the ports from when you setup the original SMTP server you will need to change that here too. Click on "More Settings" or "Manually Setup Account"
- You need to make sure that for your incoming mail that you specify port 110 and for outgoing email you specify your SMTP port number. Remember that if you don't set this up correctly your email will never work.
- Once you have completed this section, click on the "Finish" button and if everything was setup correctly you should be able to connect to your mailbox and see your test message that you sent to yourself from before.
- The last test is to try to send an email to an outside domain email and then send an email from an outbound domain to your domain and verify that it works.
[Wrap Up/Conculsion]
If you followed my post, you should be sending and receiving emails like a champion! There was a good deal of information in this post and like always if you have any questions or concerns about it, feel free to leave a comment here on my blog.
Good luck and happy emailing!
Tuesday, August 25, 2009
Thoughts on starting your own consulting company
[A little precursor]
I have had a good deal of experience in the world of information technology or at least I would like to think so:) It seems that developers always lead down the same pre-defined career paths. The first path is to start out as a junior developer working your way up through a company, then becoming a senior developer and after quite some time(*time will vary based on company*) you will eventually either become a team lead or supervisor of your team. Others may choose at this point to go back and get their master's degree and go for their MBA continuing to become a project manager and then finally a development manager or somewhere in management.
So in reality, there are really 2 paths once you become seasoned professional, 1 - stay in your field and try to get to the upper-echelon of that area or 2 - Go into management, I am sure if you are reading this you are excited about that one:) However, there is one path that I left out intentionally because I think it is the best path for someone who wants to make it big.
Start your own company!
We have all heard this statement from our friends, professors, colleagues, and yes that man on TV with the ? on this hat and shirt. I feel strongly about this because starting your own company is a huge undertaking and requires if not more than all of the other path(s) experience, wisdom, and knowledge all tied together. So the real idea here is that it's the hardest and most difficult of the paths to go down and I like to think back to my 9th grade English class when we read a poem by Robert Frost, "The Road Not Taken", where the title is pretty much explains itself. I feel this way about starting my own consulting company.
My experiences
From what I have experienced here are a few things I think you need to know about starting a consulting company in general.
- A competitive advantage
- A business plan
- Knowledge of your field
- Experience as a consultant in some capacity
- A website
- Some kind of blog
- Insurance
All of these thing are my opinions and not everything you need to start a consulting company but they will definitely help and get you pointed in the right path. Some other tips I have heard were to join local user group and communities related to your expertise. These are great places to meet local professionals and industry experts. You can learn a great deal from these events for free.
In the end, with most companies and not only consulting companies is finding clients. It is by far the hardest part for the majority of entrepreneurs out there. The best way I have found is to use websites, community events, local networking events, and word of mouth. Here is quick list of what I have found.
- Websites - LinkedIn.com, elance.com, guru.com
- Community Events - INETA.org, Cleveland Dot Net User Group
- Business Forms & Documentation - LegalZoom.com, Ohio.Business.gov, you can change the subdomain for your state
- Word of Mouth - This one is up to you!
I have began to work on my own business as well. Check out www.voralityconsulting.com
to see for yourself. It's not much , but its a start!
This not an exhaustive list but a good one to get started on your way. I would like to hear about other people experiences and how they over came them. Feel free to comment on this blog.
Post your thoughts on my blog and let me know what you think about starting your own consulting business. It would be nice to hear from others that were successful in taking this path.
Thursday, January 15, 2009
Application Architecture Guide 2.0
Application Architecture Guide 2.0
This guide was just released as a free download on CodePlex. The guide talks in-depth about best patterns and practices for designing applications built on the .NET Framework. I think anyone who is building applications, web, windows, etc., should reference this whenever they are thinking of building any application. The pdf download is pretty hefty read of about 380 pages but I think it is simple, short and consise on what developers/architects need to know about developing enterprise solutions.
You can download it below.
http://www.codeplex.com/AppArchGuide/Release/ProjectReleases.aspx?ReleaseId=20586
This guide was just released as a free download on CodePlex. The guide talks in-depth about best patterns and practices for designing applications built on the .NET Framework. I think anyone who is building applications, web, windows, etc., should reference this whenever they are thinking of building any application. The pdf download is pretty hefty read of about 380 pages but I think it is simple, short and consise on what developers/architects need to know about developing enterprise solutions.
You can download it below.
http://www.codeplex.com/AppArchGuide/Release/ProjectReleases.aspx?ReleaseId=20586
Tuesday, October 21, 2008
How to write custom code in SQL Reporting Services 2005 in 3 easy steps
Have you ever written a report in Reporting Services 2005? Most people have, but to get anything worth it's salt you need to have some pretty advanced t-sql experience or have a good background in databases to be productive in SQL Reporting Services. For those of you that are experienced in procedural language like C#.NET or VB.NET but are not in t-sql this article is for you. In this post I am going to show you a quick and dirty way to get some advanced custom code working in your reports.
First off, you need to know what your options are before you get started:
- You can build custom assemblies in any .NET compliant language of your choice
- You can embed Visual Basic code into your report directly
This article is going to discuss the 2nd option because it easier and quicker to get your custom code working than the 1st option. Don't get me wrong there are good reasons for both and it is better to know when to use one over the other in certain situations.
Now that we know what we are trying to achieve, lets dig into to some code!
Step 1: Build a report
-- Build the dataset
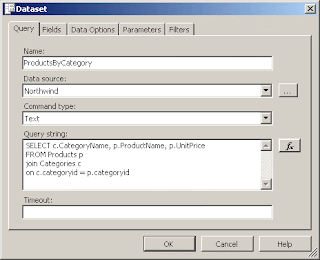
-- Build the report layout
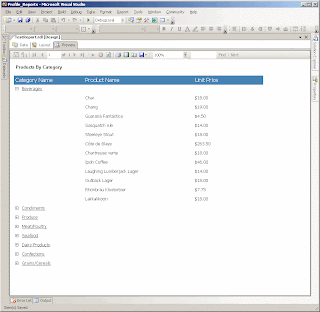
Step 2 : Add custom code to your report to do something useful
-Click on Report > Report Properties
-Click the Code tab
This is where you will put your custom code and reference in your report. Some things to take note of:
- All code that is in this block must be Visual Basic .NET code
- All code that gets executed here runs with full-trust permissions when using 'Preview'
- In order to get custom authenication hops , i.e. like database calls you must add the required assemblies and required permissions
- When performing database calls, web services calls, you need to set the trust level on the web.config file on the Report Server
- Also any additional libraries that you use, i.e. System.Data.SqlClient must be referenced explictly in the references tab.
- Any code that you use here can be directly used anywhere in your reports via the '=Code.Method()' syntax. If you are just building functions this will work, however if you put the class in the code you will need to reference the class like Code.ClassName.MethodName() in order to access it.
Step 3 : Write some Visual Basic.NET code
- I prefer to write the code in Visual Studio in a class library project so I can get the benefit of intellisense and complie-time checking. Once I have what I need, I copy it into the code tab of the Report>Report Properties window like so.
--Visual Studio Code Window
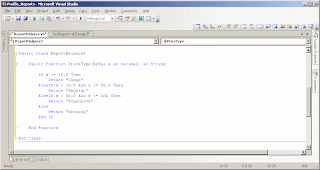
-- Copy the code into the code tab
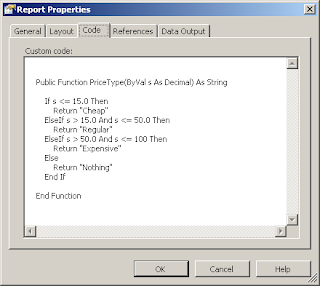
-- Place code into your report wherever you like

-- Run your report to see what your logic returns

Conclusion
To recap what we did was pretty basic in terms of complexity, but offers us the power of the .NET Framework in our reports. Because reporting services utilizes an expression-based processing engine you can make many things dynamic throughout your report. I think that personally this is the best way to add custom logic that you could not do otherwise. However, we could have hard-coded this logic in an iif() statement in the report and that would have worked as well but the point I am trying to make is that we can utilize the .NET Framework class libraries to help us write better reports faster and more efficiently.
Josh Clark
If you have any comments or questions, please comment on this blog or send me an email at
Subscribe to:
Posts (Atom)